
Create a Simple Contacts App with Angular Signals (1/2)
The Angular team has introduced a set of new reactive primitives in v16 called Signals. In this article, I'm going to introduce you to the concept of Angular Signals and we're going to build up a simple contacts app using signals and material components!
Video tutorial
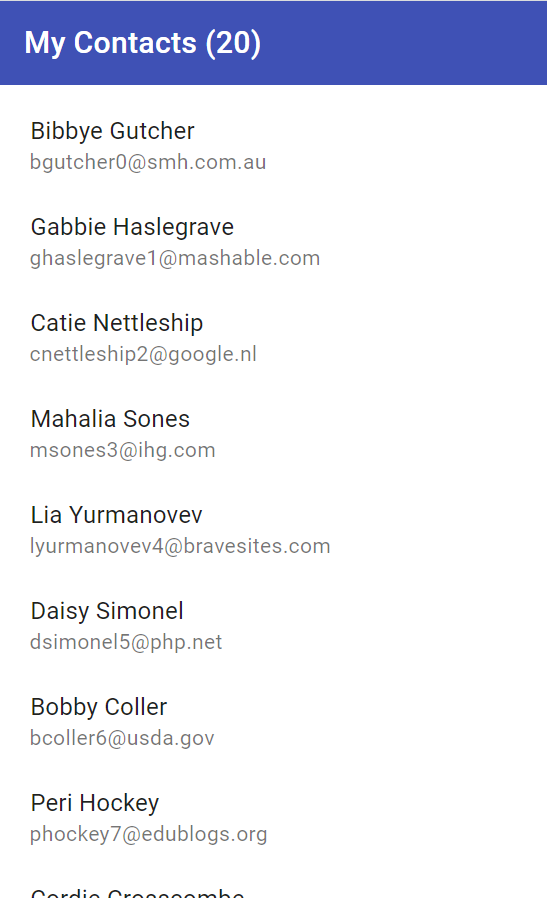
Here's what our final app will look like.

So let's get started!
What are Angular Signals?
Signals are a new reactive primitive introduced by the Angular team in v16 as a developer preview. A signal is basically a wrapper around a value. This allows the framework to track where it’s being used and modified - thus enabling it to notify all of its consumers in the code.
Why Signals?
Signals have been introduced because Angular till now has been using zone.js - a third party library to implement change detection in its components.
Zone.js has some performance problems - in that change detection always occurs from top to bottom and the whole component tree has to be traversed again and again on even a small data change.
Signals will ultimately lead to components which won’t need zonejs for change detection because signals have reactivity built in to them.
Three new reactive primitives
Signal
A signal is the basic building block of this new reactivity paradigm. As I said before, it is a wrapper around a variable and that allows the framework to track changes to it and notify any of its consumers.
So whenever a signal’s value changes, all the places its used are notified (and only those places). This is in effect the fine grained reactivity the Angular team has been talking about in recent press talks.
A signal has an initial value, then a new value can be set and the signals value can be read anywhere needed just by calling the function.
Computed
Computed is a read only signal which is derived from other signals. A computed’s value only changes if the signals it depends on change. But it cannot be updated explicitly.
Effect
Effects are functions which are run whenever the dependent signals are changed. So while computeds contain a value derived from a signal. Effects can do something whenever those values changes. As with computed, effects are only executed when only those signals it depends on are changed.
Ok, enough with all this theory. We have enough to start building our app!
We're going to create a simple CRUD-like app. The app will allow us to add a new contact, read contacts in a list and delete any contact we want. So it's a Create-Read-Delete (CRD) app - because the update part is missing. But it'll be a good showcase of how to use signals.
Setting up our project
Let's create a new standalone Angular app with the following command in CLI v16 (so make sure to install it first).
ng new --standalone
Just answer the prompts and we'll be up and running. Next, let's install the Angular Material library - so we can use it to build up our UI.
ng add @angular/material
Great. One last thing I'll do here is to include the following line in the tsconfig.json file.
"typeRoots": ["./node_modules/@angular/material"]
This will help VS code in auto importing our material modules when we need them.
This might result in a compiler error, but won't affect us running the app, so let's ignore it for now.
Adding the toolbar
So let's first start by adding the toolbar of our app in the app.component.ts file. We'll import the toolbar module and add the toolbar to our template.
@Component({
  selector: 'app-root',
  standalone: true,
  imports: [
    CommonModule,
    MatToolbarModule,
    RouterModule
  ],
  template: `
    <mat-toolbar color="primary">
      My Contacts
    </mat-toolbar>

    <router-outlet></router-outlet>
  `,
Below it we'll also add the router-outlet - where we want our components to be inserted.
So we'll have two components for the time being - contacts-list and add-contact.
Let's add them next!
Creating the components and service
We'll create the components by running the following commands.
ng g c components/contacts-list --flat --skip-tests
ng g c components/add-contact --flat --skip-tests
Also, let's create our service - which will house our business logic and the signals.
ng g s services/contacts --skip-tests
Lastly, we need to add a model file for the structure of our contact. Let's add this file in a models folder named contact.model.ts.
export interface Contact {
  name: string;
  email: string;
  phone: string;
}
Nothing fancy. Just a simple interface defining our structure.
Adding the routes
One last thing missing is the routes. We need to specify them in our app-routes.ts file, so we'll be able to see our contacts list on the base route.
So let's add the following to the file.
export const routes: Routes = [
  {
    path: "",
    pathMatch: "full",
    component: ContactsListComponent,
  },
  {
    path: "add",
    component: AddContactComponent,
  },
];
Ok, will all this set up, let's add our first signal!
Creating our first Angular Signal
Adding a signal is simple. We'll add our first signal in the contacts service, so that we can access it from different components.
@Injectable({
  providedIn: 'root',
})
export class ContactsService {
  contacts = signal<Contact[]>([
    {
      name: 'Bibbye Gutcher',
      phone: '885-131-9176',
      email: 'bgutcher0@smh.com.au',
    },
    ...
  ]);
}
Notice how we give a type to the signal using our Contact model that we just defined. So this signal represents the contacts that we'll show in our contacts list. That is why it is an array of contacts.
We've given some dummy data as an initial value.
Great! Now that we have our signal ready, we can show it on a material list. So let's get back to our component and build up the UI.
Building the contacts list
To build the contacts list UI, we'll use the material list component. After adding it to the imports, we'll add the following template code to the contacts-list component.
<mat-list>
  <mat-list-item *ngFor="let contact of contacts()">
    <h3 matListItemTitle>{{ contact.name }}</h3>
    <p matListItemLine>{{ contact.email }}</p>
  </mat-list-item>
</mat-list>
Notice how we're using the ngFor directive to loop through contacts(). This is how we access the value of a signal - just by calling it as a function.
Let's also see how we've got the reference to our signal in the component.
contactsService = inject(ContactsService);
contacts = this.contactsService.contacts;
We're using the inject() function to get our contacts service and then simply assigning the contacts signal we created.
Great! So now if we do ng serve --open, we'll be able to see a nice looking contacts list bound with the data from our signal!
Next part
In the next part, we'll continue with this app and add the remaining functionality by updating the signal that we've created.
The code for this app can be found in this github repo.
Check out my Angular and Firebase Authentication crash course

Use Angular 16, Angular Material and Firebase Authentication, Firestore and Storage to create a complete Sign Up App!
You may also like...


Learn Angular and Firebase!
Use Angular 16, Angular Material and Firebase Authentication, Firestore and Storage to create a complete Sign Up App!