

How to create a card memory game in Angular
Angular is usually associated with creating great enterprise level applications. However, that is not all the framework can do! In this article, I'm going to explain how I came up with a card memory game in Angular from scratch. It is inspired from a real card game we used to play when we were kids to test our memory.
The rules of the game
The rules were simple. We laid out cards on their backs in the form of a grid. We could only flip two cards one after the other. If they matched, we remove those cards. And if they didn't, we turned them again. The winner is the one who manages to remove all cards by remembering their pairs!
Sounds fun? You can try my version of it here.
Curious about how this was all set up? Read on and start creating your own card memory game!
Setting up the project
So first, we're going to create a new Angular app, if you don't have one already. And also add the Angular Material library, since we'll need it for its dialog and toolbar.
ng new angular-card-game
ng add @angular/material
You can choose any of the options you get from the prompts.
Creating the game card component
Next, we're going to create our game card component, which represents a single card on the UI. As you can see in the game demo, this involves creating a 3D card with front and back sections and setting up its flipping animation.
Since all of that can get a bit complex, I've explained it in more detail in a companion post which you can find below.
https://zoaibkhan.com/blog/angular-animations-create-a-card-flip-animation/
What I don't cover in the post though is the interface (inputs and outputs) of the game card component. So let's go through that here!
First, we define an interface containing all the info that the card needs.
export interface CardData {
  imageId: string;
  state: "default" | "flipped" | "matched";
}
We call it CardData and it's quite simple. The imageId represents the ID of the Unsplash image we'll load as the front side for the card (the back side is in our assets). The state represents the current state of the card at any point in time and is used to animate the card as well.
We can pass in the CardData object as an input to the game card component. And for the output, we just have a cardClicked event which we can listen for in our parent component. Here is the component code.
export class GameCardComponent implements OnInit {
  @Input() data: CardData;

  @Output() cardClicked = new EventEmitter();

  constructor() {}

  ngOnInit(): void {}
}
And the corresponding template file.
<div class="card" (click)="cardClicked.emit()" [@cardFlip]="data.state">
  <div class="face back">
    <img src="assets/card-back.jpg" />
  </div>
  <div class="face front">
    <img [src]="'https://source.unsplash.com/' + data.imageId + '/200x300'" />
  </div>
</div>
Populating the cards data
So now that we have our game card component all set up, let's make the card grid using an array of game cards. We'll do this in our app.component.ts file.
Before that though, we need to create an array to store our imageId strings. The actual cards will be twice that of the number of images we're using (since we need a pair of each in our grid).
cardImages = [
    'pDGNBK9A0sk',
    'fYDrhbVlV1E',
    'qoXgaF27zBc',
    'b9drVB7xIOI',
    'TQ-q5WAVHj0'
  ];

cards: CardData[] = [];
Next we add the code to actually fill in the cards array.
ngOnInit(): void {
    this.setupCards();
  }

setupCards(): void {
    this.cards = [];
    this.cardImages.forEach((image) => {
      const cardData: CardData = {
        imageId: image,
        state: 'default'
      };

      this.cards.push({ ...cardData });
      this.cards.push({ ...cardData });

    });

    this.cards = this.shuffleArray(this.cards);
}
The setupCards function simply loops through our card Image Ids, creates a CardData object for each, and then pushes two copies of the object to our cards array.
The spread operator (...) is important here, because we want new objects with same data, not copies by reference. In the latter case, when we change the state of the one of the cards, it'll also change the state of its pair!
Shuffling the cards!
We now have pairs of each card in our cards array, but they are positioned one after the other, which is hardly what we want. Let's shuffle them up so we can have them arranged randomly. We can use the following simple function to do so.
shuffleArray(anArray: any[]): any[] {
    return anArray.map(a => [Math.random(), a])
      .sort((a, b) => a[0] - b[0])
      .map(a => a[1]);
  }
This function does the following.
- Converts to an array of arrays, with a random number as first member and the CardData object as the second member
- Sorts the array based on the first member, resulting in a random sorting
- Converts back to an array of the second member which is our CardData object
The result is a shuffled cards array! We'll test this out in a bit.
Creating the grid layout
Since we have the cards data now, we can go ahead and setup the UI for the cards grid. We use a simple CSS grid for the purpose. Here is the template file.
<mat-toolbar color="primary" class="text-center">
  Card Memory Game
</mat-toolbar>
<div class="p-16">
  <p class="text-center">
    Tap on a card to flip it. You can only flip a maximum of two cards at a
    time. A match will remove those cards!
  </p>
  <div class="grid p-16">
    <app-game-card
      *ngFor="let c of cards; let idx=index"
      [data]="c"
      (cardClicked)="cardClicked(idx)"
    >
    </app-game-card>
  </div>
</div>
We're using the *ngFor directive here to loop through our cards array and creating that many game card components in the process. For each of them, we send in the CardData object and specify the cardClicked event to handle the click output event from the component.
The index value is also passed in the event handler function, so that we can access the relevant card item in the array (to modify it).
Last, but not the least, we also add some styling to make all of this work.
.grid {
  display: grid;
  grid-template-columns: repeat(5, 150px);
  gap: 16px;

  justify-content: center;
}

@media (max-width: 600px) {
  .grid {
    grid-template-columns: repeat(2, 150px);
  }
}
The grid class sets up a simple CSS grid with 5 columns of 150px each and a gap of 16px. The media query is added to adjust the layout for mobile screen sizes, where this shrinks to allow only two cards per row.
Now if all goes well and you run ng serve, you should see the following grid of cards.
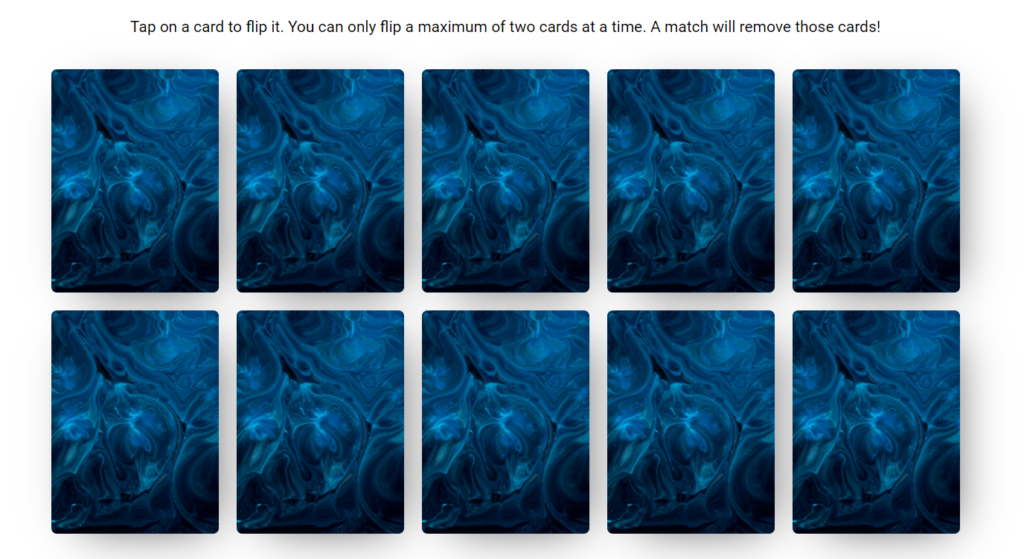
Looks great! You can also check if the cards are being shuffled correctly, by simply changing the initial state to flipped instead of default. You should then see the front side of the cards and verify that they are indeed being randomly shuffled.
Handling the card click event
Things are shaping up now and we've managed to set up our grid of cards and shuffle them up. Now let's see how we can add user interaction to this game.
The only user interaction we need here is the click or tap on the card itself. Recall we specified a cardClicked function for each game card with the index of the card being sent in as parameter. Let's setup that function!
cardClicked(index: number): void {
    const cardInfo = this.cards[index];

    if (cardInfo.state === 'default' && this.flippedCards.length < 2)
    {
      cardInfo.state = 'flipped';
      this.flippedCards.push(cardInfo);

      if (this.flippedCards.length === 2) {
        this.checkForCardMatch();
     }

    } else if (cardInfo.state === 'flipped') {
      cardInfo.state = 'default';
      this.flippedCards.pop();

    }
  }
Let's go through the steps here one by one.
First, we simply toggle the state of the card based on its current state. So if it is default, we switch it to flipped. And vice versa!
We also keep an array called flippedCards to contain the cards which are in the flipped state. We'll use this later to check for a match! But for now, we simply push to and pop from this array whenever we change the state of the card.
One last check that we add here is to prevent flipping of more than 2 cards at a time. To disallow this, we add an extra check on the flippedCards length. This will effectively disable the state change if the user taps on multiple (> 2) cards consecutively.
Checking if there is a match!
Given that we now have a flippedCards array containing the cards flipped at any time, we can use this information to check whether there is a match.
When do we do this? As soon as a card is flipped and the flippedCards are length of 2. Don't worry if you need to go through this a couple of times to see the logic being used. There is a trial and error associated with any piece of code, especially with games.
Note: This is just one way to go about it! Feel free to post a comment, if you feel this can be improved and the logic can be simpler and more concise.
Now let's see the code behind the checkForCardMatch function.
checkForCardMatch(): void {
setTimeout(() => {
const cardOne = this.flippedCards[0];
const cardTwo = this.flippedCards[1];
const nextState = cardOne.imageId === cardTwo.imageId ? 'matched' : 'default';
cardOne.state = cardTwo.state = nextState;
this.flippedCards = [];
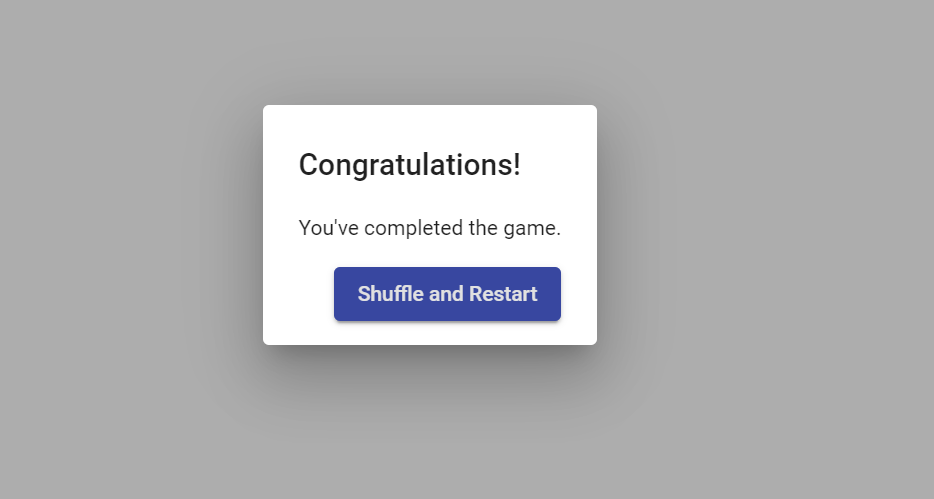
if (nextState === 'matched') {
this.matchedCount++;
if (this.matchedCount === this.cardImages.length) {
const dialogRef = this.dialog.open(RestartDialogComponent, {
disableClose: true
});
dialogRef.afterClosed().subscribe(() => {
this.restart();
});
}
}
}, 1000);
}
This seems like a lot, but is actually quite simple to understand. Let's go through this in steps.
First, we figure out what the next state of the cards should be, based on whether their imageId is equal or not. If they match, we set it to matched. Otherwise, we reset them to default.
Then, we set both cards to the state above, triggering their animations. In the case of matched, the cards simply disappear into nothingness! If not, then they revert to their default positions, so the user can select two other cards.
We also reset the flippedCards to empty.
Lastly, we need to check when all cards have been matched. For this, we simply keep a counter named matchedCount and increment it when there is a match. As soon as the matchedCount is equal to the number of images that we have, we show a material dialog congratulating the user and allow him/her to reset the game again.
You might have noticed that we keep all of this code for matching the cards inside a setTimeout function. The reason for this is to give some time for the card flip animations to complete, before we check for matches.
Resetting the game
With our card memory game fully functional now, the last thing that we need to do is to allow the user to reset the game. We can simply call our setupCards function and reset the matchedCount to do this.
restart(): void {
    this.matchedCount = 0;
    this.setupCards();
}
Conclusion
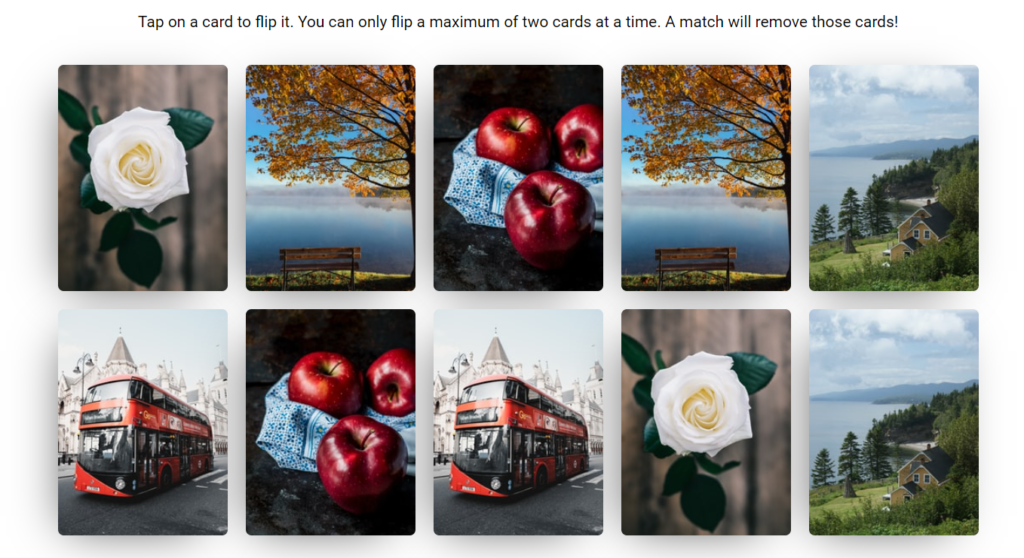
Congrats! This wasn't too bad was it? Here's a test run of our game!
As you can see, creating a game is fun, but can be a bit complicated as well. Having set the groundwork though, you can now extend it as you wish. Some features to add could be allowing the user to set their own images, increasing or decreasing the cards and/or keeping scores.
You're only bounded by your creativity here!
I hope you liked this different Angular tutorial and learnt as much as I did during the process.
The code for the card memory game is available on this github repository.
Thanks for reading. Bye! :)
Check out my Angular and Firebase Authentication crash course

Use Angular 16, Angular Material and Firebase Authentication, Firestore and Storage to create a complete Sign Up App!
You may also like...


Learn Angular and Firebase!
Use Angular 16, Angular Material and Firebase Authentication, Firestore and Storage to create a complete Sign Up App!