

Angular vs React: a code comparison for developers
Being an Angular developer, I've always been curious about the React ecosystem and how to code in React. Recently, I dived into learning more about React and as a result coded up a simple app in both Angular and React to study the differences. I'm now able to do an Angular and React code comparison!
This should especially be a good help for other Angular developers getting into React and also for React developers getting into Angular.
Our final result will be a simple contacts app, which has been designed to showcase how to do the most common jobs in both front-end frameworks (or libraries).
Without further delay, let's get started!
Setting up our projects
Angular setup
For Angular, we're going to use the newest version 11.20. So if you don't have that installed, please update your Angular CLI using the following command.
npm uninstall -g @angular-cli
npm install -g @angular/cli@latest
The reason this is needed is because the latest version comes with out of the box support for Tailwind CSS, which we're going to use in our project for the UI. It is hugely popular nowadays and fun too!
Then just create a new Angular app and install Tailwind CSS.
ng new angular-contacts
cd angular-contacts
npm install --save tailwindcss
npx tailwindcss init
Lastly, we just need to add the tailwind styles to our styles.scss file like below.
@tailwind base;
@tailwind components;
@tailwind utilities;
To run the app, just go ahead and run ng serve --open.
React setup
To setup the project in React, we're going to use create-react-app. Just run the following command in your terminal.
npx create-react-app react-contacts
To set up Tailwind CSS in our project properly, just follow the steps outlined in the official documentation. And then run npm run start.
Great, we're now ready to go! 🚀
Creating data for the apps
Every web app has some set of data that we need to store, so that we can use it to display stuff on the UI. Let's see how we can do this in Angular and React.
Angular
In Angular, we can declare our data in the form of class variables. In our case, we'll just have a list of contacts for our app. We're going to declare them in our app.component.ts file.
export class AppComponent {
contacts = [
    {
      name: 'Bibbye Gutcher',
      phone: '885-131-9176',
      email: 'bgutcher0@smh.com.au',
    },
    {
      name: 'Gabbie Haslegrave',
      phone: '541-172-6277',
      email: 'ghaslegrave1@mashable.com',
    },
   ...
  ];

filteredContacts = [...this.contacts];
}
In addition, we'll also have a filteredContacts array, which we can show when the user searches a contact. This is initially just a copy of the original contacts.
React
So how do we declare some data in React? If we were using class based components, we could declare it like we did in Angular. But here I'll follow the cleaner option of using functional components.
When using functional components, we'll need the Hooks API, specifically the useState hook like below. We add this to our main App.js file.
function App() {
  const [contacts, setContacts] = useState([
    {
      name: "Bibbye Gutcher",
      phone: "885-131-9176",
      email: "bgutcher0@smh.com.au",
    },
    {
      name: "Gabbie Haslegrave",
      phone: "541-172-6277",
      email: "ghaslegrave1@mashable.com",
    },
    ...
  ]);

  const [filteredContacts, setFilteredContacts] = useState(contacts);
}
Great! We have some data now to show on the UI 👏
Creating components - the building blocks
Both in Angular and React, components are the building blocks of your web app. So let's go ahead and organize our app into components conceptually. In our case it'll be quite simple, we'll just have two components.
- Header component: This will contain the title and the search box
- Contacts List component: This will contain the contacts list UI
Let's see how we can place these components on our UI in Angular and React.
Angular
For Angular, we can simply add the components to our main template file like below.
<app-header></app-header> <app-contacts></app-contacts>
Simple, right? Except we'll also need to specify the component inputs and outputs (more on that in the next sections).
To create a new component in Angular, simply run the following command using the Angular CLI.
ng generate component header
ng generate component contacts
React
In React, we specify the components in JSX instead in the following form.
return (
  <Fragment>
    <Header></Header>
    <Contacts></Contacts>
  </Fragment>
);
Fragment here is used to specify a container which is not actually rendered on the UI (could also use a simple div).
To create a new component in React, just create a .js file anywhere in your app with the function exported.
Component inputs/props
Next, let's see how we can specify inputs to components in both Angular and React. For our header component, we won't have any inputs. But for our contacts list component, we'll take in the input the contacts list that we'll show.
Angular
For Angular, we use the following code to specify inputs to components.
<app-contacts [data]="filteredContacts"></app-contacts>
For static values, we can omit the square braces ([]), while for dynamic values such as our filteredContacts array, we need to specify the braces.
How do we access this input inside of the component? In Angular, we use the Input() decorator to declare a variable which can then be used anywhere in the component.
export class ContactsComponent implements OnInit {
  @Input() data: any[];

  constructor() {}
  ngOnInit(): void {}
}
React
In React, we have no square braces. Inputs are basically just props, or properties, we send to a component. To specify dynamic values, we can use the curly braces instead.
<Contacts data={filteredContacts}></Contacts>
Also, we can access any of the props inside of the component by referencing the input parameters of the functional component. We're using Javascript de-structuring here to directly refer to the data input inside of the props.
function Contacts({ data }) {
  return <div>{data}</div>;
}
Component outputs/props
Components can also have outputs, that they can send to their parent component to notify them of actions or events. In our case, we'll just have an output from our header component to tell the main component to search the contacts when the user types in something.
Here is how to do it in Angular and React.
Angular
<app-header (searchContacts)="searchContacts($event)"></app-header>
We specify events or outputs in Angular with braces and then give the event handler defined in our component. Here it's defined in our component ts file.
searchContacts(term: string) {
    this.filteredContacts = this.contacts.filter((c) =>
      c.name.toLowerCase().includes(term.toLowerCase())
    );
}
We're using the array filter function to change the filteredContacts data when we get this output from the header.
How do we specify the output inside of the component in Angular? We use the Output() decorator to declare an EventEmitter for this purpose. We can call emit on this when we need to send the output.
@Component({
  selector: 'app-header',
  template: `
    <input

 (keydown)="searchContacts.emit($event.target.value)"
/>

  `,
  styleUrls: ['./header.component.scss'],
})

export class HeaderComponent implements OnInit {
  @Output() searchContacts = new EventEmitter<string>();
  ...
}
I've added the template here as an inline template to show how to bind event handlers to user events.
React
In React, outputs are a bit different and are specified as props. So inputs and outputs both are basically props to a component. Let's see how it all looks in React.
function App() {
  const [contacts, setContacts] = useState([
...]);

  const [filteredContacts, setFilteredContacts] = useState(contacts);

  function searchContacts(e) {
    setFilteredContacts(
      contacts.filter((c) =>
        c.name.toLowerCase().includes(e.target.value.toLowerCase())
      )
    );
  }

  return (
    <Fragment>
      <Header searchContacts={searchContacts}></Header>
      <Contacts data={filteredContacts}></Contacts>
    </Fragment>
  );
}
So this is something Angular developers would not be used to. The searchContacts function is actually specified as a prop to the Header component. This is then called from within the component when it needs to send the output.
function Header({ searchContacts }) {
  return <input OnChange={searchContacts} />;
}
Also, note here how we're specifying the user event handler from the input.
Great! Now that we have the basic organization of our components and their inputs/outputs/props covered, let's move on to actually building the components 😎
Styling our apps - classes
There is no UI without styling. Well, technically there is, but it will be very ugly! Let's then see how to add styling to our Angular and React apps.
Since we're using Tailwind CSS, we'll be following the utility-first pattern for our styling. This means we'll only need to specify classes for our HTML elements, rather than make style files ourselves. If you're new to this whole concept, just visit the following link to learn more about it!
Utility-first style on Tailwind CSS docs
Angular
In Angular, setting classes to elements is exactly like it is in simple HTML. Just use the class attribute. Here is an example of how we added styles to our header component.
<nav
  class="bg-indigo-600 text-white h-16 w-auto p-4 flex flex-row justify-between items-center"
>
  <span class="text-2xl">Contacts App</span>
  <button class="flex items-center">
    <span class="material-icons">search</span>
  </button>
</nav>
React
In React, we specify classes by using the className property on any element. For example, our header component above has the following code in React.
return (
    <Fragment>
      <nav className="bg-indigo-600 text-white h-16 w-auto p-4 flex flex-row justify-between items-center">
        <span className="text-2xl">Contacts App</span>

          <button className="flex items-center" onClick={showSearch}>
            <span className="material-icons">search</span>
          </button>
      </nav>
    </Fragment>
So it's quite simple to migrate this from React to Angular. Just replace className with class and you're good to go!
Here is how the header component looks like till now.

Conditional rendering
Showing a part of the UI based on a condition is one of the main features that any web framework needs to have. To showcase how to do this in Angular and React, I added a search bar to our header component, which appears when we click on a search icon button. This is how it should look like.

Angular
In Angular, we use the *ngIf structural directive to apply conditions to different HTML elements in the template. Let's go ahead and add the search bar to the template.
<nav
  class="bg-indigo-600 text-white h-16 w-auto p-4 flex flex-row justify-between items-center"
>
  <span class="text-2xl">Contacts App</span>
  <button *ngIf="!search" class="flex items-center" (click)="showSearch()">
    <span class="material-icons">search</span>
  </button>

  <div *ngIf="search" class="flex flex-row bg-indigo-400 rounded p-2">
    <input
      class="bg-indigo-400 outline-none"
      autofocus="true"
      (keydown)="searchContacts.emit($event.target.value)"
    />
    <button class="flex items-center" (click)="hideSearch()">
      <span class="material-icons">close</span>
    </button>
  </div>
</nav>
We've added a search boolean variable to our component, based on which we can toggle the appearance of the search button and the input field. The showSearch and hideSearch functions are used to toggle the states.
export class HeaderComponent implements OnInit {
  @Output() searchContacts = new EventEmitter<string>();

  search = false;

  constructor() {}

  ngOnInit(): void {}

  showSearch() {
    this.search = true;
  }

  hideSearch() {
    this.search = false;
  }
}
React
To achieve the same functionality in React, we first use the useState hook to create a search boolean variable. Then we use the curly braces syntax along with the && short-circuit operator to render the two parts of the UI conditionally.
function Header({ searchContacts }) {
  const [search, setSearch] = useState(false);

  const showSearch = () => setSearch(true);

  const hideSearch = () => setSearch(false);

  return (
    <Fragment>
      <nav className="bg-indigo-600 text-white h-16 w-auto p-4 flex flex-row justify-between items-center">
        <span className="text-2xl">Contacts App</span>
        {!search && (
          <button className="flex items-center" onClick={showSearch}>
            <span className="material-icons">search</span>
          </button>
        )}
        {search && (
          <div className="flex flex-row bg-indigo-400 rounded p-2">
            <input
              className="bg-indigo-400 outline-none"
              autoFocus="true"
              onChange={searchContacts}
            ></input>
            <button className="flex items-center" onClick={hideSearch}>
              <span className="material-icons">close</span>
            </button>
          </div>
        )}
      </nav>
    </Fragment>
  );
}
The short circuit operator (&&) returns the right side when left condition is true, otherwise returns false (which means nothing in our case). There can be multiple ways to do the same though, but this is what I found easier to read.
Great! If you test now, you'll be able to see the search button and input field toggling between the two states on user interaction. We're already firing off the search event when user types in the input field, so all that is required now is to work on our contacts list!
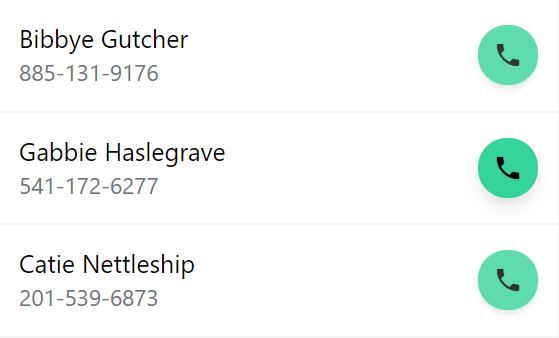
Rendering a list
Lists are an important part of any moderate to complex web app. For our simple app, we need to render the list of contacts based on our filteredContacts array. Let's see how we can implement a list in Angular and React.
Angular
In Angular, we need to use the *ngFor structural directive to specify that we want to loop through an array to display the UI. Here is how we setup our contacts list component.
<div class="overflow-scroll">
  <div
    *ngFor="let contact of data"
    class="p-4 border-b-2 border-gray-100 flex flex-row justify-between align-middle"
  >
    <div>
      <p class="text-xl">{{ contact.name }}</p>
      <p class="text-gray-500 text-lg">{{ contact.phone }}</p>
    </div>
    <a class="flex items-center" [href]="'tel:' + contact.phone">
      <span
        class="material-icons p-3 rounded-full opacity-80 shadow-md bg-green-400 hover:opacity-100 hover:shadow-lg"
      >
        phone
      </span>
    </a>
  </div>
</div>
As you can see, once we have a reference to a single contact in our contacts list using *ngFor, we can then use the double curly braces syntax ({{ }}) to get properties of that contact.
React
React follows a more pure Javascript style instead. Here we use the array map function to map each item of the contacts to its list item, which is then returned from the functional component.
function Contacts({ data }) {
  return (
    <div className="overflow-scroll">
      {data.map((contact) => (
        <div className="p-4 border-b-2 border-gray-100 flex flex-row justify-between align-middle">
          <div>
            <p className="text-xl">{contact.name}</p>
            <p className="text-gray-500 text-lg">{contact.phone}</p>
          </div>
          <a className="flex items-center" href={`tel:${contact.phone}`}>
            <span className="material-icons p-3 rounded-full opacity-80 shadow-md bg-green-400 hover:opacity-100 hover:shadow-lg">
              phone
            </span>
          </a>
        </div>
      ))}
    </div>
  );
}
Recall we use the single curly braces syntax to specify expressions or dynamic values, so we place the map function on the data inside of that. For specifying properties of a single contact, we do the same as in Angular, except with a single curly brace.
Woohoo! If you test it out now, we'll have a simple contacts list in both Angular and React with a phone icon next to it, so the user can call the number directly.
Tweaking the app: Adding inline styles
Let's end this Angular and React code comparison with a simple tweak to our app. When you scroll the list, the header goes out of view as well. We want the header to remain where it is instead. To do this, we need to give a fixed height to the list, so that only the list gets scrolled.
Let's see how we can add an inline style in both Angular and React.
Angular
In Angular, you just add the style attribute with the set of inline styles you want to add. So here we'll add a height css style to our list.
<div class="overflow-scroll" style="height: calc(100vh - 64px)">...</div>
React
In React, it is done a bit differently in double curly braces.
<div className="overflow-scroll" style={{ height: "calc(100vh - 64px)" }}>
  ...
</div>
The end result though is the same and we get a nice looking sticky header, while our list continues to scroll.
Conclusion
Phew! That was a lot to cover in one blog post 😅
But I hope you've found this Angular and React code comparison useful. It covers just the basics though. In future articles, I plan to cover the more advanced use cases such as network calls, state management etc.
If you'd like, you can check out my other Angular articles here.
Hope this short guide helps those who are looking to learn Angular or React - especially if they already have some knowledge about one of them.
The code for both of these apps is available in the following github repos.
https://github.com/thisiszoaib/react-contacts.git
https://github.com/thisiszoaib/angular-contacts.git
Thanks for reading. Bye 😊
Check out my Angular and Firebase Authentication crash course

Use Angular 16, Angular Material and Firebase Authentication, Firestore and Storage to create a complete Sign Up App!
You may also like...


Learn Angular and Firebase!
Use Angular 16, Angular Material and Firebase Authentication, Firestore and Storage to create a complete Sign Up App!