
Angular 17 Defer block: Create a Lazy-loaded Youtube Player for a blog!
Interested in maximizing your Angular app's efficiency by learning how to lazy load components using the new Defer block in Angular v17? In this post, I'll walk you through the details of building a lazy-loaded video component and explore the various options available to trigger lazy loading.
Video
If you're more of a reader, check out the text tutorial below :)
Setting Up The Project
We'll be starting with an Angular version 17 project created through the updated CLI. To follow this tutorial, make sure you update your CLI using ng update command or install it globally with the following command at the terminal
npm install @angular/cli -g
We have also installed the latest Angular material package, version 17, and the YouTube Player package, an official Angular YouTube player module that gets regular updates.
ng add @angular/material
npm install @angular/youtube-player
With these all set up, let's dive into the code.
Initial Setup of Our Code
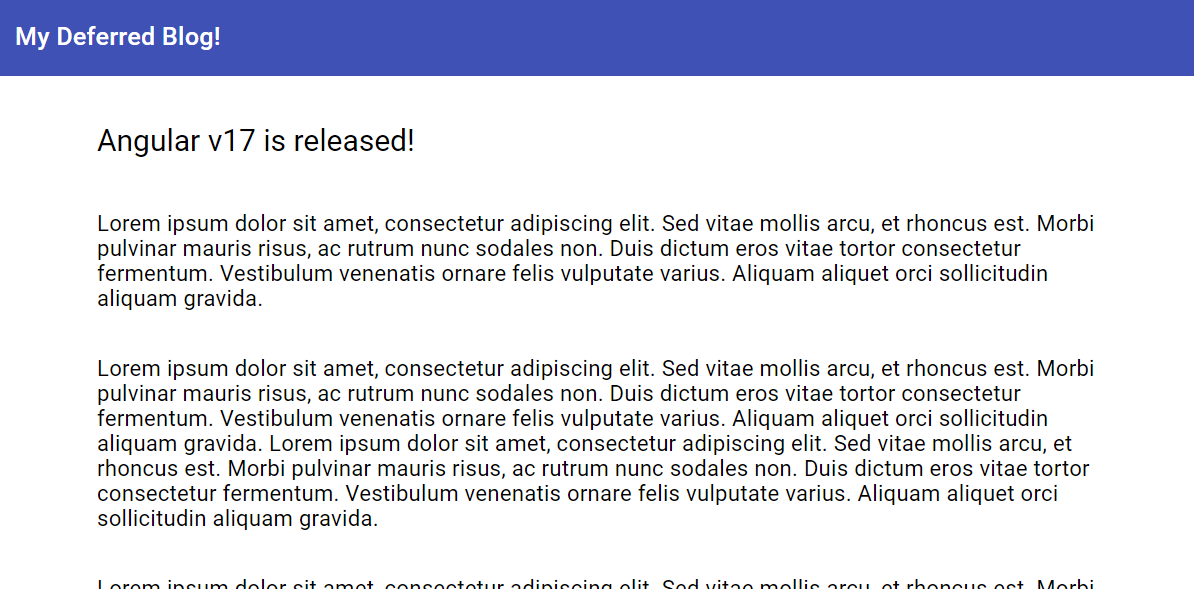
I have put together a basic blog page, which is a common use case for the deferred video block. Creating a simple material toolbar titled "My Deferred blog" I made a container with a blog section, title, and some dummy text paragraphs.
<mat-toolbar color="primary"> My Deferred Blog! </mat-toolbar>
<div class="container">
  <section class="blog">
    <h1>Angular v17 is released!</h1>
    ...dummy text paragraphs
  </section>
</div>
I intend to insert a lazy-loaded YouTube video in between this text!
Creating a New Component for Lazy Loading
To create our video component used for lazy loading, we use the ng generate component command to generate a new component, which we place inside of the components folder. We named this new component VideoComponent.
In this video component, we remove the common module and import the YouTube player module.
import { YouTubePlayerModule } from '@angular/youtube-player';

@Component({
  selector: 'app-video',
  standalone: true,
  imports: [YouTubePlayerModule],
  template: `
    ...
  `
})
Note: By default, Angular CLI v17 will create a
standaloneapp i.e. with standalone components generated automatically. Hence, you can see the flag in every component decorator, as above!
The rendered YouTube player requires the use of the Iframe API and an added script tag. I have created a service to perform this action in the YouTube service. This service loads and adds the script tag for the iframe API only once and enables a signal once the script has been added.
@Injectable({
  providedIn: "root",
})
export class YoutubeService {
  public readonly apiLoaded = signal(false);

  constructor() {
    if (!this.apiLoaded()) {
      // This code loads the IFrame Player API code asynchronously, according to the instructions at
      // https://developers.google.com/youtube/iframe_api_reference#Getting_Started
      const tag = document.createElement("script");
      tag.src = "https://www.youtube.com/iframe_api";
      document.body.appendChild(tag);
      this.apiLoaded.set(true);
    }
  }
}
Applying an if condition using the new control flow syntax, we know when the IFrame is entirely loaded and now we can add the youtube player to the template.
@Component({
  ...
  template: `
    @if(apiLoaded()) {
    <youtube-player
      ...
    />
    }
  `
})
export class YoutubeVideoComponent {
  apiLoaded = inject(YoutubeService).apiLoaded;
}
YouTube Player Parameters
The YouTube player takes width, height, and video ID parameters. Since we want to develop a reusable component, we'll take the video ID as input. We will make video ID a requirement and add a definite assertion operator. Then, we will add an autoplay parameter within player variables, causing the video player to play automatically as soon as it loads.
@Component({
  ...
  template: `
    @if(apiLoaded()) {
    <youtube-player
      [playerVars]="{ autoplay: 1 }"
      [width]="800"
      [height]="400"
      [videoId]="id"
    />
    }
  `
})
export class YoutubeVideoComponent {
  @Input({ required: true })
  id!: string;
  ...
}
Now we're ready to add the video component to the main blog, and we insert it after about four paragraphs in the text. We also need to add the video ID, which is one of my course introduction videos here (as an example).
<p>...</p>
<app-video id="DzXMkLCAPRE" />
<p>...</p>
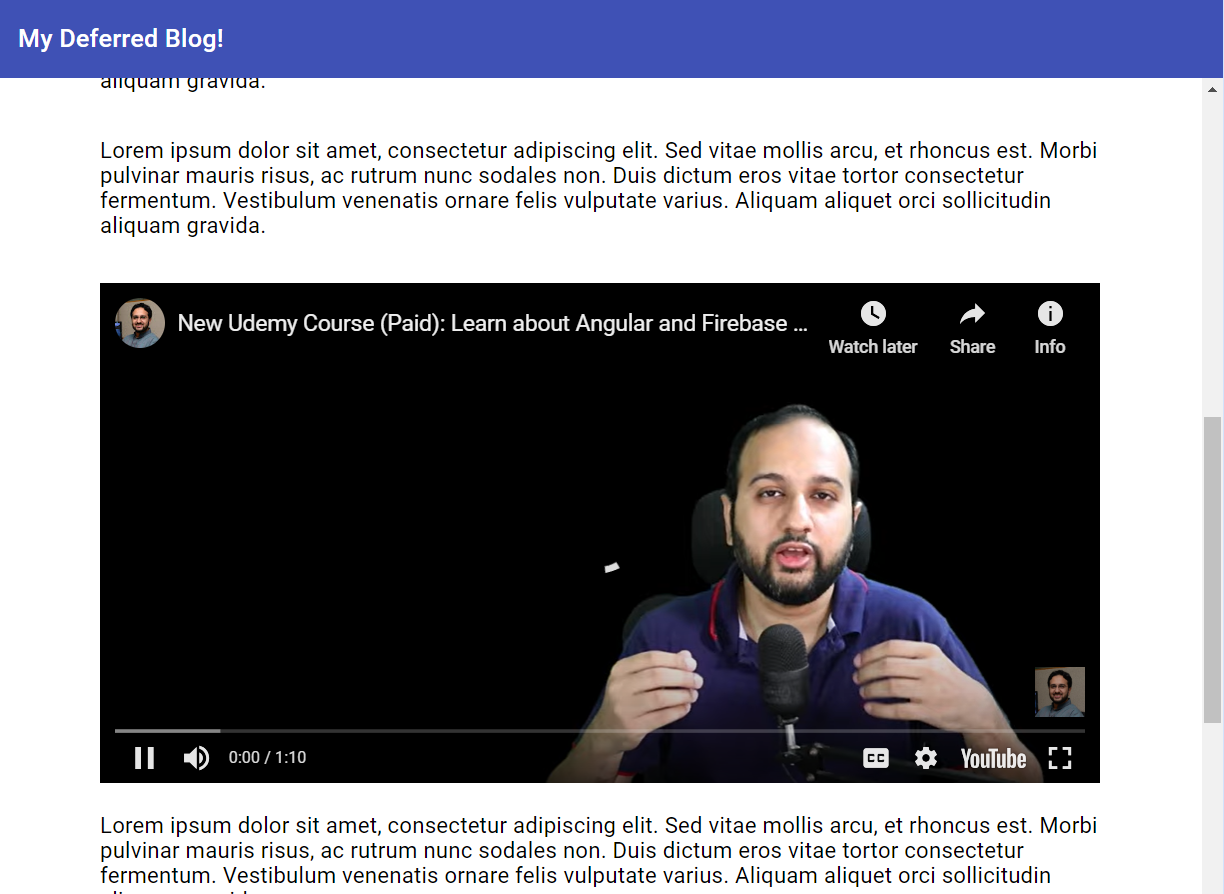
When we preview our blog, we notice the video loaded automatically without any lazy loading occurring. This means we haven't reduced our initial load time yet.
Let's add some lazy loading!
Leveraging Defer Block
To achieve lazy loading, we can use Angular's new defer block. By adding the defer block to our video component, we create a lazy chunk file separate from the main bundle of the app. This single action reduces the initial load time.
@defer {
<app-video id="DzXMkLCAPRE" />
}

Using defer without specifying a particular trigger, by default applies the 'on idle' trigger. 'On idle' indicates that the chunk file loads only when the browser is idle after it has completed loading everything else on the page.
The different defer triggers available
Triggers we can specify on the Defer block includes
- On Viewport
- On Timer
- On Hover
- On Interaction
- Combinations of these.
On Viewport trigger
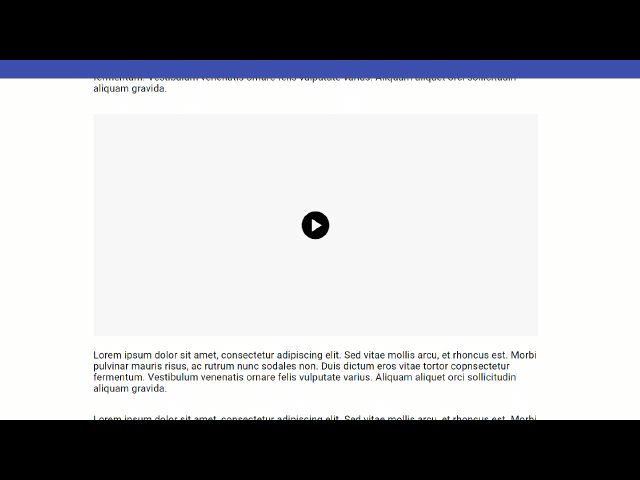
On Viewport is a useful trigger that triggers lazy loading when the user scrolls to the specific component needing lazy loading. This tool functions with the Intersection Observer API. However, angular needs an element to add the intersection observer API to. Thus, we need to provide a placeholder block, which will be displayed before the component is lazy loaded.
I've created a simple video placeholder to do the needful - which also caters for showing a loader when the input is passed (more about loading block is below)
@Component({
  selector: "app-placeholder",
  standalone: true,
  imports: [MatIconModule, MatProgressSpinnerModule],
  template: `
    <div>
      @if(loading) {
      <mat-progress-spinner [diameter]="50" mode="indeterminate" />
      } @else {
      <mat-icon>play_circle</mat-icon>
      }
    </div>
  `,
})
export class PlaceholderComponent {
  @Input() loading = false;
}
So this is how the defer block looks now.
@defer(on viewport) {
<app-video id="..." />
} @placeholder {
<app-placeholder />
}
Now when we reload the app, we'll notice our new lazy loaded chunk is not loaded instantly. But it only does so when we scroll down to the VideoComponent. This is the viewport trigger in action!
Nice :)
Timer trigger
The timer trigger will cause lazy loading to occur only after a specified number of milliseconds or seconds pass.
@defer(on timer(5s)) {
<app-video id="..." />
} @placeholder {
<app-placeholder />
}
To test it out, we can give a 5s duration and then see the lazy loading in action. It's useful for when you want to load different parts of the UI with slight intervals - to give a nice, smooth loading experience!
Hover trigger
The hover trigger will cause lazy loading to occur when the user hovers over the placeholder element.
@defer(on hover) {
<app-video id="..." />
} @placeholder {
<app-placeholder />
}
The Hover trigger is a superb indication of user interest so it makes sense to use when you want to prepare the UI for the user doing something.
Interaction trigger
The interaction trigger will cause lazy loading to occur only after the user actually interacts (i.e. clicks) on the placeholder element.
@defer(on interaction) {
<app-video id="..." />
} @placeholder {
<app-placeholder />
}
Combination of triggers
A user can also set the Timer, Viewport and other triggers to work in conjunction such that lazy loading will occur once either of these two events occur.
@defer(on viewport; on timer(5s)) {
<app-video id="..." />
} @placeholder {
<app-placeholder />
}
Prefetching chunks
One interaction pattern that can be really useful here is in combination of hover and interaction triggers - by also utilizing the prefetch option.
Prefetching is the loading of a resource before it is required to decrease the time waiting for that resource. Source
With the defer block, prefetch can be used with any of the triggers discussed before. So for example, we can prefetch the chunks we need for the player on hover, while only render them with the interaction trigger.
This will decrease the wait time further - because hovering usually indicates user interest in the UI element!
@defer(prefetch on hover; on interaction) {
<app-video id="..." />
} @placeholder {
<app-placeholder />
}
So you can see how the defer block provides such a lot of flexibility to add all kinds of lazy loading behavior to your Angular apps in simple, intuitive code!
Adding Loading Subblock
Often, during lazy loading, a UI flicker occurs at the time the lazy loaded component is loading. The solution to this is the @loading subblock that provides an indicator that the current block is loading.
@defer(on interaction) {
<app-video id="..." />
} @placeholder {
<app-placeholder />
} @loading {
<app-placeholder [loading]="true" />
}
But sometimes, the loading is so quick that the loader does not even show up. For this purpose, Angular allows us to specify a minimum amount of time to show this loading subblock before transferring to the component being lazy loaded.
We give here a 500ms minimum time to show the loader below.
@defer(on interaction) {
<app-video id="..." />
} @placeholder {
<app-placeholder />
} @loading(minimum 500ms) {
<app-placeholder [loading]="true" />
}
This makes the User Experience much better!
Conclusion
The final result is an efficient lazy-loaded player that only loads when the user interacts with it.
Utilizing the power of Defer block in Angular v17 greatly optimizes your Angular app and is easy to use. It offers an array of trigger options that make customizing your user experiences exciting.
"The Defer block in Angular v17 brings in a lot of new possibilities to optimize your Angular app and is also pretty intuitive to use."
There are even more in-depth features like the when trigger for custom conditions, but those will be covered later.
Thanks for reading, and see you in the next post!
Check out my Angular and Firebase Authentication crash course
Use Angular 16, Angular Material and Firebase Authentication, Firestore and Storage to create a complete Sign Up App!
You may also like...


Learn Angular and Firebase!
Use Angular 16, Angular Material and Firebase Authentication, Firestore and Storage to create a complete Sign Up App!